Tuesday, 16 June 2015

One Pot Winter Warmer

Do you like washing up?  

I love the nights when I can get the washing up done quickly or, even better, when there is so little it can wait for the next night.

This meal for the whole family only uses one pot, only cuts one onion (cutting board and knife) and needs one spoon to stir.  Can't get much simpler in my books!


Mince with the lot (or mince, vegetables and macaroni)

Ingredients
1 Onion - diced
1 Tabsp oil
1 kg mince (the most lean you can afford)
1 1/2 cups frozen mixed vegetables - corn, carrot, peas
1 tin tomato soup (420g)
3 Tabsp tomato paste
1 beef stock cube
1/2 packet dry macaroni shells (adjust this to suit your family)

Method
1.  Dice onion.
2.  Heat oil in large pan.  Add onion and stir until soft.
3.  Add mince in 250g lots and stir until browned.
4.  Add frozen vegetables, tomato soup, tomato paste and stock cube.  Stir well.
5.  Add 3 soup tins water and then macaroni shells.  Stir well.
6.  Bring to the boil, stirring.
7.  Reduce heat and simmer for 30 minutes, stirring occasionally to prevent macaroni sticking to pan.  Add more water if it becomes too dry before macaroni is soft. 

This is something that your whole family will enjoy - if you want more vegetables, add them.
If you want less macaroni,  use less and reduce the water a little. 
It can be served with grated cheese on top, or if you have leftovers, it can be frozen.

I hope you try this recipe soon.  Enjoy!!


Thursday, 11 June 2015

What type of soup are you making?

Tonight I made a Bacon and Vegetable Soup.  It is one of my favourite soups, as it varies each time I make it, according to what is in the refrigerator and pantry.


Ingredients
1 packet soup vegetables (carrot, onion, swede, turnip, celery, potatoes) from supermarket or a mixture of similar vegetables.
1 sweet potato
1 Tabsp oil
1 425g tin chopped tomatoes
2 beef stock cubes
1 Packet short cut bacon
6 cups water
Tomato sauce
1 Tabsp worcestershire sauce
salt and pepper

Method
1.  Peel and dice all vegetables into pieces of a similar size.
2.  Dice bacon.
3.  Heat oil in a large saucepan.
4.  Add bacon and diced vegetables.  Stir until bacon has crisped a little and vegetables have started to colour.
5.  Add tomatoes and their juice, stock cubes and water. Season with a little salt and pepper.
6.  Add a squirt of tomato sauce - this reduces any acidity from the tomatoes.  Alternatively, add 1 teas sugar.  Add worcestershire sauce.
7.  Stir well and bring to the boil.
8.  Lower heat and simmer, with lid on, for 30-40 minutes, until all the vegetables are soft.
9.  Serve with buttered toast.

This soup keeps well in the refrigerator for several days.  Try to reheat only the portion size you are going to eat.   Always bring it back to the boil and simmer for several minutes.  
It can also be frozen in meal-sized portions.

If you've got some vegetables and stock cubes, you can have soup.  So go on, make some this weekend and enjoy the warmth it creates during this chilly Sydney weather.

Quilt Progress

Don't you love a productive day.  I know I do!

After cutting out the picture panels on Friday night and getting the first borders around each block, I got stuck.


How was I going to make these individual blocks into a quilt top?  I had a variety of fabrics to use - that I had been collecting over a couple of years.  But the more I thought about it, the more I wanted to make sure the fabrics I used didn't take away from the pictures.


What do you do at this stage?  I look for people to ask, or if I can, show.  Several people suggested 2" squares joined together into blocks to fill the spaces, so I cut 2 1/2" strips ready to join, but I couldn't find a sequence I thought was right.  More time thinking.....

When my daughter came around, she was put in front of the quilt pieces, with the fabric choices that I had.  Her preference was to keep all the borders darker, so that the pictures stood out more.  Now all I had to do was hope that I had enough of the fabric to finish the job....  That's the problem with buying the fabric over the years and not today.

The next thing to organise was the backing and batting.

I found some fabric that would be suitable for the backing.


In my stash there is plenty of cotton batting, but maybe I should try the iron-on batting, in the hope that I can machine quilt.

So we went for a quick (who was I kidding - me quick in Craft Depot) trip to get the iron-on batting.


When we got back, we had new backing fabric, 6 other lots of fabric (1 metre or 1/2 metres) that perfectly suited other projects in my mind and a reel of cotton.  Where is the batting - I decided that I would use what I had at home (does this sound familiar or am I the only one that does this?) 

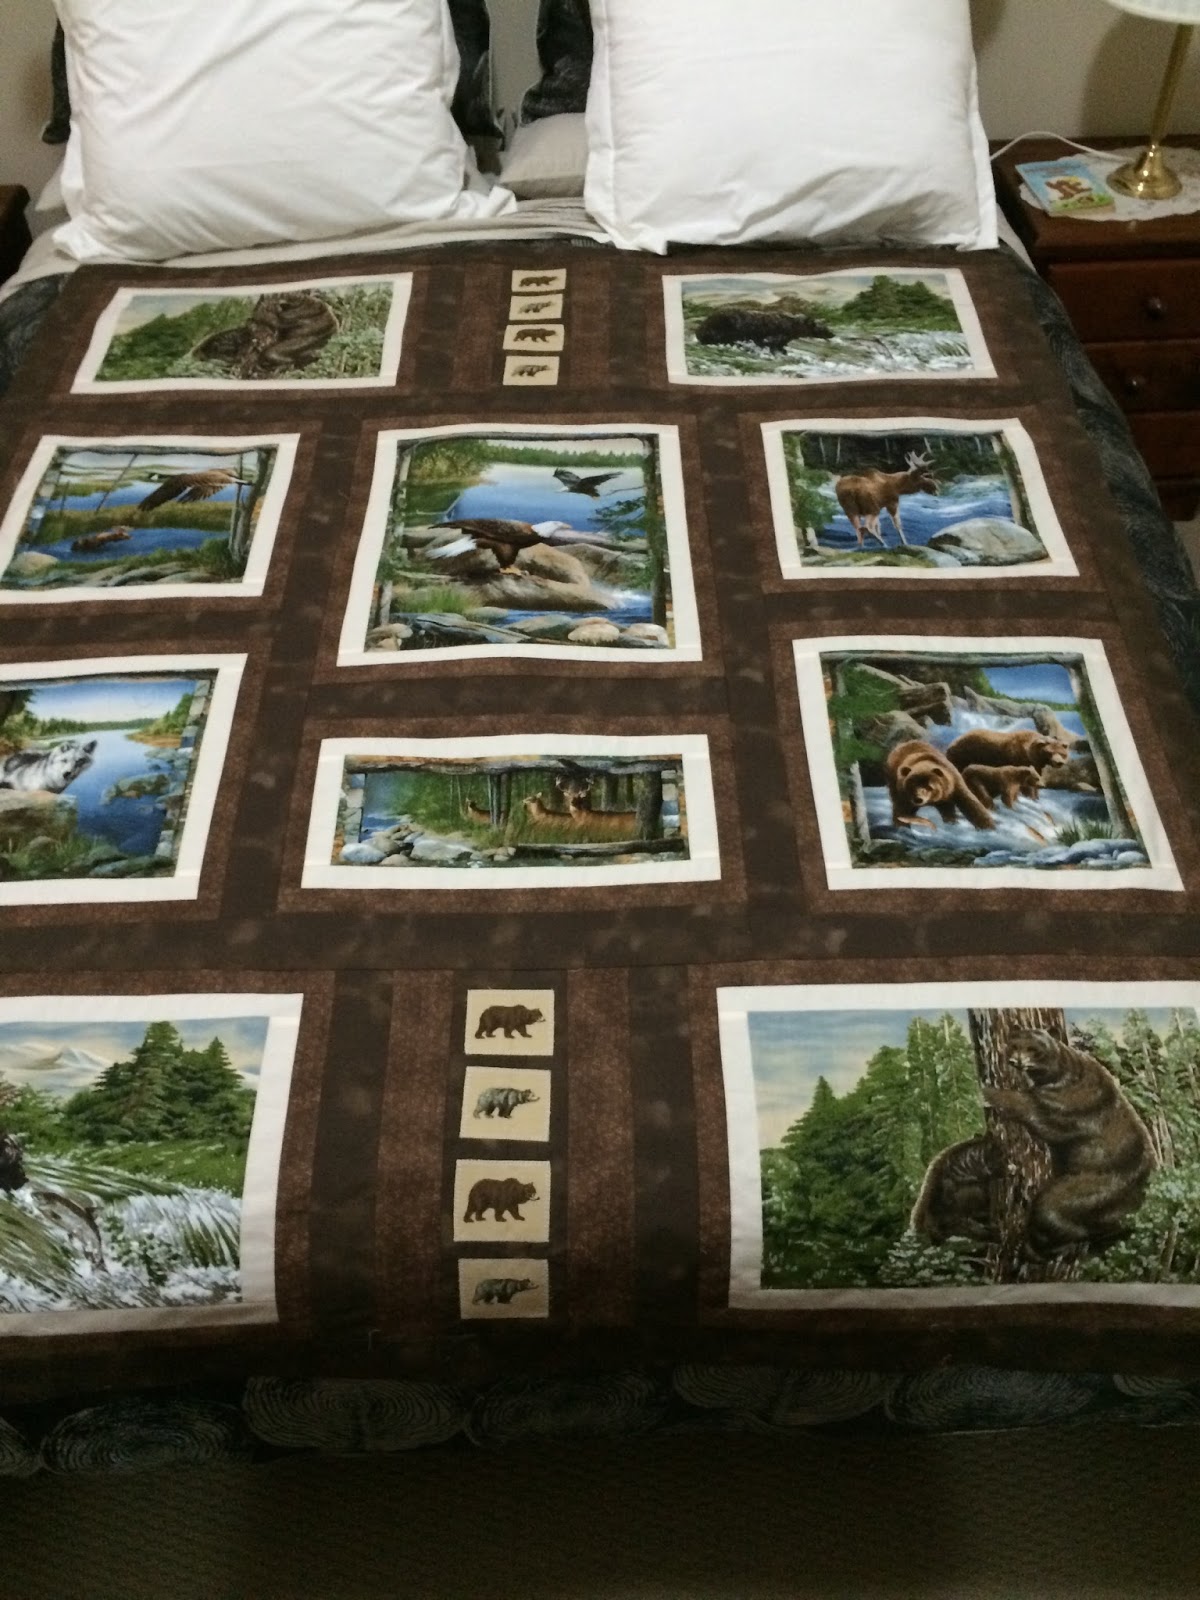
So today, I have had a very productive day and have now made the top of my quilt ......


The small bears were a border to one of the picture fabrics.  I have used them to break up the big blank sections at the top and bottom.

Yay!!!! 

Next week I'll add the batting and backing.  Wish me luck... I always find this stressful.

Sunday, 7 June 2015

Friday Night with Friends

Tonight I was a bit sidetracked, finishing my clerical duties for the mainly music group I coordinate.

But I'm pleased to report that this procrastination didn't stop me from starting a new quilt for a June birthday.  I purchased the fabric in 2007 on our first cruise and have been waiting for the perfect opportunity to use it.

So this is where I'm up to:


I've cut the 10 pictures and bordered them with 1 1/2" strips of cream with tan dots.  (I may narrow this border a bit.)

They are laid out as I will include them in the quilt.  Now I have to fill in the gaps..... to make it fit the top of this queen bed.

Any ideas for doing this?  I'm open to suggestions as I want to finish the top this week.

Thanks for encouraging us to work on our projects through FNwF Cheryll.


Wednesday, 20 May 2015

Making Tissue and Wipe Covers. Do your sewing projects multiply?

Making tissue pack covers is so easy!!!  I recently saw a post here that used this method to make covers for the small tissue packs we carry in our handbags. 

So I thought I'd give them a go.  Then came the idea to make covers for Wet Ones to go with them.  This would be a good 'Mothers' Day gift' for my daughter and daughters-in-law too.  I mean, doesn't every mother need both tissues and wet ones in her handbag?

Both are constructed the same way - I'll demonstrate what I did with the Wet One Pack.


Cut outer fabric and lining:

For the tissues, you need to cut the outer fabric 5 1/2" x 6 1/2" and the lining 5 1/2" x 7 1/2"

For the Wet Ones, the outer fabric is 5 1/2" x 7 1/2" and the lining is 5 1/2" x 8 1/2"


With right sides together, stitch one short edge - 1/4" seam.  Trim seam.


Repeat with other short end.  Note: you will have a 'bubble' on the lining side as it is longer.

Turn to right sides and press seams towards lining.  Smooth out extra lining fabric, making sure you have the same amount of lining showing on each end.


Machine in the ditch to keep lining 'Trim' in place.  Repeat at other end.


Fold finished edges into the centre, lining fabric on outside.


Stitch across each end with a 1/4" seam - I reversed at beginning, over centre edges and at the end for added strength.


Overlock or zigzag across raw edges.


Turn through to right side, making sure corners look square.   Press.


Fill with your Wet Ones (or tissues).  I folded the crimped edges of the Wet Ones under as I put them in, so that they were more snug.  Otherwise you would need to make the cover a little wider (6 1/2" not 5 1/2")


Well, after making my three sets for the girls, I just kept going, so now my sister and sister-in-laws and a niece and friends have received these packs... and there are another 10 sets ready to be filled with tissues and Wet Ones.

If you are using fat quarters, I think I got 7 out of each one.  Cut 5 1/2" strips then cross-cut into outer fabric sized pieces to suit either the tissues or the Wet Ones.  I used yardage for the lining, again cutting 5 1/2" strips and then cross-cutting appropriately.

Looking at the post linked above, I have noticed that the centre edges were overlapped slightly before sealing ends shut.  The corners were also boxed.  So I am sure there are many ways to make these covers.  In the past I have added lace at the shorter ends as a trim, omitting the need for the lining to be longer than the outer fabric.  

So why not have a go and tidy up your handbag with these easy to spot covers for your tissues and wipes.  And I'll be surprised if you can stop at one set!!!


Monday, 18 May 2015

Nothing beats Chicken Soup when you're fighting colds and flu...

I don't know about you, but my family all love Chicken Soup when they are sick.  I think it is the broth, with some 'good for you vegetables' and this soup adds tasty BBQ chicken too.

Making this soup is easy - all you have to do is chop vegetables and break apart BBQ chicken.  Once this is done it is all added to a big pot and 30mins later you have a tasty meal.

I made this one for my daughter Wen and her family last week:


(Thanks for the photo Wen)
Ingredients:
1 leek - cut off roots, then cut in half lengthwise and slice white section
2 carrots - peel and dice into 0.5cm (1/4") cubes (if they are bigger they will just need to cook longer)
3 sticks celery - trim ends and dice about same size as carrots
1 BBQ chicken - remove skin (and eat) and bones.  Break flesh apart into smallish pieces
60 grams (1/4 cup) butter or margarine
1/4 cup plain flour
2 chicken stock cubes - I use Massel brand
1.5 litres water - add more if soup gets too thick.

Method:
1.   Prepare chicken and vegetables.
2.   Heat butter in large pot.
3.  Add chopped vegetables and cook for 3 minutes, stirring to prevent them burning.
4.  Add stock cubes and flour.  Cook, stirring for 1 minute.
5.  Slowly add water, while stirring, and cook until soup thickens (a little) and comes to the boil.
6.  Add shredded chicken.
7.  Lower heat and cook for 20 minutes with the lid on the pan.  Stir occasionally so it doesn't stick to pan.
8.  Check seasoning levels - I don't add extra salt as stock can sometimes be salty.
9.  Serve as desired - we usually use large bowls!

Notes:
- If the soup is too thick, add extra water and reheat.
- If you prefer chicken broth, don't add the flour and reduce the butter to 1 Tabsp.
- If you want something with a bit more 'heat' try adding curry powder.

I love making soups.  They are pretty forgiving when it comes to measuring ingredients and cooking times.  So why not give this one a go!  I'm sure it will taste just as good as mine!


Friday, 1 May 2015

FRIDAY Night with FRIENDS

I joined the group FNwF organised by Cheryll this week.  I have wanted to finish a couple of projects that required some focus and no TV, so thought this would be a good way to get me into my sewing space for the night.

Over the last couple of months I have been knitting Kina cardigans for some of our family.  As I still had the urge to keep going, I raided my tiny (ha,ha,ha) stash of yarn and retrieved 10 balls of Caressa  from (quite) a few years ago.  As this top knits from the neck down, the Kina is a good project if you want to knit while not really concentrating on every stitch.  Care is needed when increasing soon after starting and when reaching the sleeve section (unless you want a cape), but otherwise you just knit.

My kina has travelled with me for the last couple of weeks in the bag I received from a recent swap through Sew n Swap (on Facebook)


The knitting part was finished, but I needed to sew the underarm seam and finish off all the joined yarn.  I realised that I have been spoiled by using 200g balls from Bendigo Woollen Mills (very few joins) recently - 50g balls meant lots of joins.  A button was added to the neckline and this was finished - yay!!! I knitted something, other than scarves, for myself.


Now for the next project to complete.

I have been making some Breast Cancer bags through Jody.  The bags are used to carry the drains after breast surgery (allowing patients to move about while wearing a drain).  I have done this before and love using cheerful fabrics to make this time a little brighter.  I made the bags this week, but they still needed pressing and having their cards (wishing love and positive thoughts to the recipient) added.


I have achieved this tonight too!  Now I can send these off to Jody this week.

I'm up to filling the heart now for the children's wards through 'Sew Handmade' (Facebook)


This has been a productive and very enjoyable evening.  I look forward to seeing what everyone else got up to too.

So until the next FNwF, enjoy doing the things that you love.